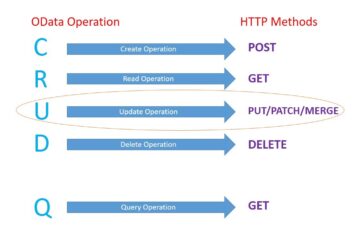
As the name suggests, create method/operation is used to create a new entry or record for the respective entity.
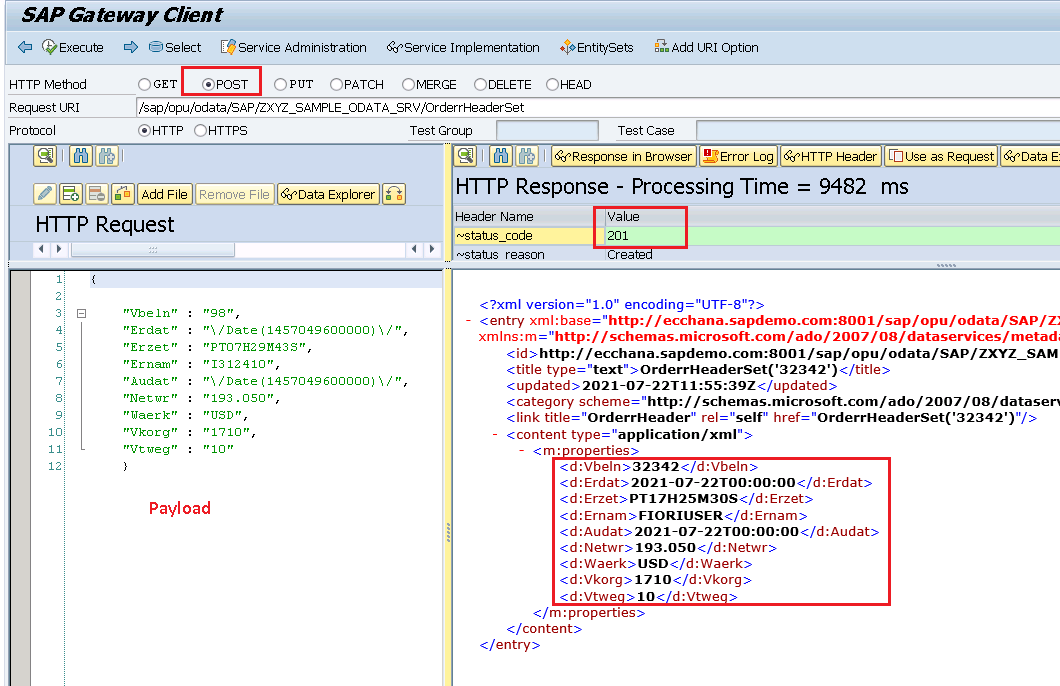
In our previous parts, we are dealing with sales header information (Part 5), in the same fashion, we will create new sales order in the system by using create_entity. And the create operation is type POST method in HTTP


Create_entity takes payload(payload is nothing but a json/xml object) as a request, which is the same as the entity type
You can create a payload either via manually or use the option of “Use as request” in its corresponding get call/operation as in the below image

In real-time, you will get the payload from the UI developer to test/debug the same or from the trace(Tracing: we will cover in due course)
But if you want to create the payload manually then take care of case sensitiveness and get the validation from external formatting tools like https://jsonformatter.curiousconcept.com/#
Now, let’s move to the coding part: The basic requirement is to create a sales order in reference to sales order provided in the payload. In the current example lets create a sales order with reference to sales order 98
Code implemented inside the create_entity method after redefining the method.
Note: This is sample logic, you can implement any logic as per your need once received the payload
  METHOD orderrheaderset_create_entity.
    "Data declaration
    DATA: ls_vbakkom      TYPE vbakkom,
          ls_vbak         TYPE vbak,
          ls_payload_data TYPE zcl_zxyz_sample_odata_mpc=>ts_orderrheader.
    "Get the data from the payload
    io_data_provider->read_entry_data( IMPORTING es_data = ls_payload_data ).
*----------------------------------------------------------------------*
* 00. initialization                                                   *
*----------------------------------------------------------------------*
* a) BAPIs run without dialog                                          *
    CALL FUNCTION 'DIALOG_SET_NO_DIALOG'.
* b) call beleg_initialisieren                                         *
    CALL FUNCTION 'SD_SALES_DOCUMENT_INIT'
      EXPORTING
        simulation_mode_bapi = space.
*----------------------------------------------------------------------*
* 02. copy the document                                                *
*----------------------------------------------------------------------*
    CALL FUNCTION 'SD_SALES_DOCUMENT_COPY'
      EXPORTING
        i_auarn        = 'TA'
        i_vbeln        = ls_payload_data-vbeln
        call_from_bapi = 'X'
      IMPORTING
        fvbakkom       = ls_vbakkom
      EXCEPTIONS
        error_message  = 01.
    CHECK sy-subrc = 0.
*----------------------------------------------------------------------*
* 00. save the new document                                            *
*----------------------------------------------------------------------*
    CALL FUNCTION 'SD_SALES_DOCUMENT_SAVE'
      IMPORTING
        evbak         = ls_vbak
      EXCEPTIONS
        error_message = 01.

    IF sy-subrc EQ 0.
      MOVE-CORRESPONDING ls_vbak TO er_entity.
    ENDIF.

  ENDMETHOD.
As a result, a new sales order was created in the system

Previous Part: Paging in OData Service ($top,$skip)- Part 6- ABAP Skill SAP
Next Part:


1 Comment
More about Update Operations in OData -Part 8 - ABAP Skill · July 29, 2021 at 4:37 pm
[…] our previous part, we have already created a sales order by using the post method. Let’s update the […]